Showing posts with label How-To. Show all posts

Wednesday, January 6, 2010

Kindle How-To: Using Text-to-Speech in Kindle DX


Your Kindle can read aloud your books (where allowed by the rights holder), newspapers, magazines, blogs, and personal documents with the Kindle Experimental application, Text-to-Speech.

To turn on Text-to-Speech, follow these steps:

  1. Press the Text key .

  2. Move the 5-way down so that the “Text-to-Speech” option is underlined. Press the 5-way to select “turn on.” In a few moments, you will hear your content spoken aloud. You can either listen to it through the Kindle’s external speakers or plug in earphones into the headphone jack.
  3. By default, content is spoken with a male voice, but using the 5-way, you can select a female speaking voice. You can also slow down or increase the rate of speech as well as pause or turn off Text-to-Speech.
  4. While Text-to-Speech is playing, the screen will update to the corresponding page of text.

For PDF files and books which the rights holder does not allow Text-to-Speech to read aloud their content, then “Text-to-Speech” will be grayed and you will not be able to select it.

By default, Text-to-Speech starts reading at the beginning of the page currently displayed. To start reading at a particular spot, move the cursor where you’d like the reading to begin before starting Text-to-Speech.

Tip: You can also play or stop Text-to-Speech by holding down the Shift key and pressing the Symbol key . You can pause and resume Text-to-Speech by pressing the Spacebar.

Buy Kindle DX (US Wireless)

Saturday, December 26, 2009

Kindle How-To: Charging and Powering Up Your Kindle DX


Kindle DX ships with a U.S. power adapter and a Kindle micro-USB cable. You can charge your Kindle DX by connecting it to your computer via the Kindle micro-USB cable or by connecting it to a wall socket using the Kindle micro-USB cable and the Kindle U.S. power adapter plug. The light on your Kindle DX next to the USB socket will appear yellow when charging and change to green when Kindle DX is fully charged.

Note on third-party charging devices (not included with your Kindle DX): Third-party charging devices, power converters, USB wall chargers, and other charging hubs are not supported nor recommended for your Kindle DX.

Charging from Your Computer via Kindle Micro-USB Cable

When using the Kindle micro-USB cable to charge your Kindle via your computer, charging time will normally take 4 to 6 hours. To charge your Kindle DX from a computer via Kindle micro-USB cable:

  • Connect Kindle DX directly to a USB port on your computer. Do not connect through a hub, keyboard, or monitor.

    Illustration of Kindle connected to a computer via USB
  • Connect Kindle DX to a computer plugged into a power outlet. We recommend keeping your computer plugged into a power outlet while charging your Kindle DX. Your computer may not supply sufficient power to the USB port if it is not plugged in.
  • Make sure your computer stays on during the entire charging process. Disable Standby, Hibernate or Sleep mode, if necessary.
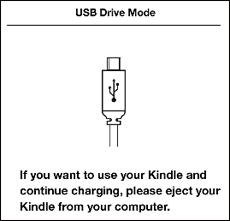
  • Verify Kindle DX recognizes the USB connection. You can verify your Kindle DX is charging if you see the USB drive mode screen. If you do not see this screen, unplug and reconnect your Kindle DX. You may also need to select an alternate USB port.

Illustration of Kindle screen when in USB drive mode.

Using Kindle while Charging via Kindle Micro-USB Cable

You can use your Kindle while it is connected and charging from your computer. For most operating systems, you simply need to select “unmount,” “eject” or “safely remove” for the Kindle USB drive using your computer’s file browser without actually disconnecting the USB cable. Kindle DX will then exit USB drive mode and display the Home screen. You’ll see a lightning bolt on the battery status icon that indicates Kindle is still charging.

If you use the Windows Vista operating system on your computer, using the “Safely Remove Hardware” command will not work. Use the “Eject” option instead. Click on the Windows Start button on your computer and select “Computer” from the options. Right-click on the Kindle drive icon and select “Eject” from the pop-up menu.

Using Kindle’s Power Switch

The Power switch on top of Kindle DX puts it to sleep, wakes it up, and turns your Kindle on or off.

To wake up or turn on your Kindle: Slide and release the power switch again.

To put your Kindle to sleep: Slide and release the power switch. (Other keys and buttons are locked in Sleep mode.)

To turn your Kindle off: Slide and hold the power switch for four seconds until the screen goes blank and then release.

To reset your Kindle: Disconnect your Kindle from any power source, and then slide and hold the power switch for 15 seconds before releasing.

Illustration of top of Kindle2 showing power button and sound port.

Tip: Your Kindle DX will also go to sleep by itself after ten minutes if you are not using it. If your Kindle had wireless on prior to going to sleep, it will continue to receive your regularly scheduled subscriptions while in sleep.

Buy Kindle DX (US Wireless)

Saturday, December 19, 2009

Kindle How-To: Using Text-to-Speech in Kindle 2


Your Kindle can read aloud your books (where allowed by the rights holder), newspapers, magazines, blogs, and personal documents with the Kindle Experimental application, Text-to-Speech.

To turn on Text-to-Speech, follow these steps:

  1. Press the Text key .
  2. Illustration of Text-to-Speech controls on Kindle.

  3. Move the 5-way down so that the “Text-to-Speech” option is underlined. Press the 5-way to select “turn on.” In a few moments, you will hear your content spoken aloud. You can either listen to it through the Kindle’s external speakers or plug in earphones into the headphone jack.
  4. By default, content is spoken with a male voice, but using the 5-way, you can select a female speaking voice. You can also slow down or increase the rate of speech as well as pause or turn off Text-to-Speech.
  5. While Text-to-Speech is playing, the screen will update to the corresponding page of text.

For PDF files and books which the rights holder does not allow Text-to-Speech to read aloud their content, then “Text-to-Speech” will be grayed and you will not be able to select it.

By default, Text-to-Speech starts reading at the beginning of the page currently displayed. To start reading at a particular spot, move the cursor where you’d like the reading to begin before starting Text-to-Speech.

Tip: You can also play or stop Text-to-Speech by holding down the Shift key and pressing the Symbol key . You can pause and resume Text-to-Speech by pressing the Spacebar.

Buy Kindle (Global Wireless)

Friday, December 18, 2009

Kindle How-To: Register/Deregister a Kindle


Register your Kindle to access features such as purchasing and downloading content. If you no longer have access to your Kindle or transferred it to another user, you should deregister your Kindle from your account.

To register or deregister your Kindle:

  1. If you are not already on the Home screen, press the “Home” button.
  2. Press the “Menu” button. Make sure that Whispernet is turned on.
  3. Move the 5-way down until “Settings” is underlined and press to select.
  4. Press the 5-way to select “register” or “deregister” from the Settings screen.
  5. If you’re registering Kindle, enter your Amazon.com user name and password (the e-mail address and password associated with your Amazon account) using the keyboard.
  6. Navigate the 5-way to select “OK” to finish the process or “Cancel” to abort.

Tip: If your Amazon user name or password contains characters not present on the Kindle keyboard, press the Symbol key to see a menu of additional characters. You can also register or deregister your Kindle on the Manage Your Kindle page.

Buy Kindle (Global Wireless) Buy Kindle DX (US Wireless)

Wednesday, December 16, 2009

Kindle How-To: Transferring Files Via USB

Transferring Files Via USB

Both Macintosh and Windows users can download and transfer Kindle content, personal documents, and MP3 and Audible files from their computers to their Kindles through the USB connection. When your Kindle is plugged into your computer, your Kindle will appear as a removable mass-storage device.

System Requirements

  • Windows-based: Windows 2000 or later.
  • Macintosh: Mac OS X 10.2 or later.
  • USB port: An available port or an attached USB hub with an available port.

Making the Connection

The illustration below shows a Kindle and a laptop computer connected through the USB cable.

Illustration of Kindle connected to a computer via USB

To connect Kindle to your computer:

  1. Plug the larger end of the USB cable into an available USB port or a powered USB hub connected to your computer.
  2. Connect the other end of the USB cable to the micro-USB port on the bottom of your Kindle.

When connected to your PC, your Kindle will go into USB drive mode and its battery will be recharged by the computer. Your Whispernet service is temporarily shut off and you will not receive any of your subscriptions while in this mode. Also, your Kindle is not usable as a reading device while you are in USB drive mode, but will return right to where you were when you undock the device from your computer.

Tip: If you’d like to continue reading your Kindle while its battery is being charged by the computer, you will need to release it from USB drive mode by undocking or ejecting the Kindle from the computer. Note that it is always best to use your computer to undock or eject your Kindle before disconnecting the USB cable. Consult your computer manual for details on how to properly disconnect a USB storage device.

To move files to and from Kindle:

  1. Connect your Kindle to your computer as described above. Your Kindle should appear on your computer in the same location you would normally find an external USB drive.
  2. Use your computer’s file browser to drag and drop files to and from Kindle.
  3. When finished, using your computer’s undock feature to remove your Kindle.

Remember, Kindle will only recognize transferred files if:

  • File types are listed in the Files Kindle Recognizes section below.
  • File are transferred to the correct folder for their type.
  • Files are free of digital rights management software.
Buy Kindle (Global Wireless) Buy Kindle DX (US Wireless)